> ## Documentation Index
> Fetch the complete documentation index at: https://private-7c7dfe99-trino-dialect.mintlify.site/llms.txt
> Use this file to discover all available pages before exploring further.
> إعداد Amazon RDS Postgres كمصدر لـ ClickPipes
# دليل إعداد مصدر RDS Postgres
export const IAMAuthentication = ({engine, service, children}) => {
const services = {
aurora: {
name: 'Aurora',
resource: 'cluster',
id: 'cluster-xxxxxxxxxxxxxx'
},
rds: {
name: 'RDS',
resource: 'instance',
id: 'db-xxxxxxxxxxxxxx'
}
};
const createUserStatements = {
postgres: `CREATE USER clickpipes_iam_user;
GRANT rds_iam TO clickpipes_iam_user;`,
mysql: `CREATE USER 'clickpipes_iam_user' IDENTIFIED WITH AWSAuthenticationPlugin AS 'RDS';`
};
const svc = services[String(service).toLowerCase()];
const createUserSql = createUserStatements[String(engine).toLowerCase()];
if (!svc) throw new Error(`Unsupported IAM authentication service: ${service}`);
if (!createUserSql) throw new Error(`Unsupported IAM authentication engine: ${engine}`);
return <>
Instead of a password, you can authenticate the ClickPipes user with an AWS IAM role. This lets ClickPipes connect to your Amazon {svc.name} {svc.resource} without storing database credentials.
Enable IAM authentication
- Log in to your AWS account and go to the {svc.name} {svc.resource} you want to configure.
- Click Modify.
- Scroll to the Database authentication section.
- Select Password and IAM database authentication.
- Click Continue.
- Review the changes and select Apply immediately.
Create the ClickPipes user
Create the ClickPipes user with IAM authentication enabled, then grant it the same schema and replication privileges shown above:
{createUserSql}
{children}
Obtain the ClickHouse service IAM role ARN
- Log in to your ClickHouse Cloud account.
- Select the ClickHouse service you want to connect.
- Select the Settings tab.
- Scroll to the Network security information section at the bottom of the page.
- Copy the service's Service role ID (IAM) value, shown below.
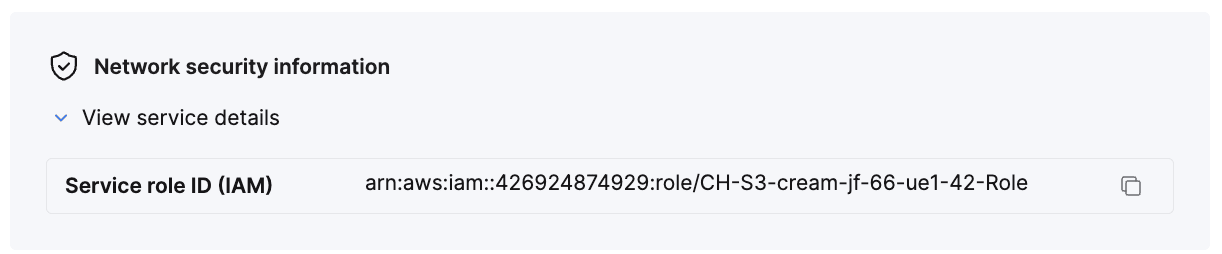
This value is your {'{ClickHouse_IAM_ARN}'} — the role ClickPipes uses to access your {svc.name} {svc.resource}.
Obtain the resource ID
- Log in to your AWS account and go to the {svc.name} {svc.resource} you want to configure.
- Select the Configuration tab.
- Note the Resource ID value — it looks like
{svc.id}. This is your {'{RDS_RESOURCE_ID}'}, which you reference in the permissions policy.
Create the IAM role
- Log in to your AWS account with an IAM user that has permission to create and manage IAM roles.
- Open the IAM console.
-
Create a new IAM role with the following trust and permissions policies.
Trust policy (replace {'{ClickHouse_IAM_ARN}'} with the IAM role ARN of your ClickHouse instance):
{`{
"Version": "2012-10-17",
"Statement": [
{
"Effect": "Allow",
"Principal": {
"AWS": "{ClickHouse_IAM_ARN}"
},
"Action": [
"sts:AssumeRole",
"sts:TagSession"
]
}
]
}`}
Permissions policy (replace {'{RDS_RESOURCE_ID}'} with the resource ID of your {svc.name} {svc.resource}, {'{RDS_REGION}'} with its region, and {'{AWS_ACCOUNT}'} with your AWS account ID):
{`{
"Version": "2012-10-17",
"Statement": [
{
"Effect": "Allow",
"Action": [
"rds-db:connect"
],
"Resource": [
"arn:aws:rds-db:{RDS_REGION}:{AWS_ACCOUNT}:dbuser:{RDS_RESOURCE_ID}/clickpipes_iam_user"
]
}
]
}`}
- Once the role is created, copy its ARN. This is your
{'{RDS_ACCESS_IAM_ROLE_ARN}'}.
You can now use this IAM role to authenticate with your {svc.name} {svc.resource} from ClickPipes.
;
};
export const Image = ({img, alt, size = "lg"}) => {
const normalizedSize = ["sm", "md", "lg"].includes(size) ? size : "lg";
return ;
};
## إصدارات Postgres المدعومة
تدعم ClickPipes Postgres بالإصدار 12 وما بعده.
## تمكين النسخ المتماثل المنطقي
يمكنك تخطي هذا القسم إذا كان مثيل RDS لديك مُهيأ بالفعل بالإعداد التالي:
* `rds.logical_replication = 1`
عادةً ما يكون هذا الإعداد مُعدًّا مسبقًا إذا كنت قد استخدمت سابقًا أداة أخرى لنسخ البيانات.
```text theme={null}
postgres=> SHOW rds.logical_replication ;
rds.logical_replication
-------------------------
on
(1 row)
```
إذا لم يكن ذلك مُهيّأً بالفعل، فاتبع الخطوات التالية:
1. أنشئ مجموعة معلمات جديدة لإصدار Postgres لديك تتضمن الإعدادات المطلوبة:
* اضبط `rds.logical_replication` على 1
2. طبّق مجموعة المعلمات الجديدة على قاعدة بيانات Postgres في RDS
3. أعد تشغيل مثيل RDS لديك لتطبيق التغييرات
## إعداد مستخدم قاعدة البيانات
اتصل بمثيل RDS Postgres الخاص بك باستخدام مستخدم مسؤول، ثم نفّذ الأوامر التالية:
1. أنشئ مستخدمًا مخصصًا لـ ClickPipes:
```sql theme={null}
CREATE USER clickpipes_user PASSWORD 'some-password';
```
2. امنح المستخدم الذي أنشأته في الخطوة السابقة وصولًا للقراءة فقط على مستوى المخطط. يوضح المثال التالي الأذونات الخاصة بالمخطط `public`. كرّر هذه الأوامر لكل مخطط يحتوي على جداول تريد نسخها:
```sql theme={null}
GRANT USAGE ON SCHEMA "public" TO clickpipes_user;
GRANT SELECT ON ALL TABLES IN SCHEMA "public" TO clickpipes_user;
ALTER DEFAULT PRIVILEGES IN SCHEMA "public" GRANT SELECT ON TABLES TO clickpipes_user;
```
3. امنح المستخدم امتيازات النسخ المتماثل:
```sql theme={null}
GRANT rds_replication TO clickpipes_user;
```
4. أنشئ [publication](https://www.postgresql.org/docs/current/logical-replication-publication.html) يتضمن الجداول التي تريد نسخها. نوصي بشدة بقصر الـ publication على الجداول التي تحتاج إليها فقط لتجنّب أي حمل إضافي على الأداء.
يجب أن يحتوي أي جدول مُدرج في الـ publication إما على **مفتاح أساسي** معرّف، *أو* أن تكون **replica identity** الخاصة به مضبوطة على `FULL`. راجع [الأسئلة الشائعة لـ Postgres](/ar/integrations/clickpipes/postgres/faq#how-should-i-scope-my-publications-when-setting-up-replication) للحصول على إرشادات حول تحديد النطاق.
* لإنشاء publication لجداول محددة:
```sql theme={null}
CREATE PUBLICATION clickpipes FOR TABLE table_to_replicate, table_to_replicate2;
```
* لإنشاء publication لجميع الجداول ضمن مخطط محدد:
```sql theme={null}
CREATE PUBLICATION clickpipes FOR TABLES IN SCHEMA "public";
```
يحدّد الـ publication `clickpipes` مجموعة الجداول التي ستُبث أحداث التغيير الخاصة بها إلى ClickPipes. نوصي بعدم استخدام `FOR ALL TABLES` إلا إذا كنت تنوي نسخ كل الجداول، لأن تضمين جداول غير ضرورية يزيد من حركة WAL من Postgres إلى ClickPipes ويقلّل من الكفاءة الإجمالية للنسخ المتماثل.
### استخدام مصادقة IAM (اختياري)
تتطلب مصادقة IAM للنسخ المتماثل تعيين المعلَمة `rds.iam_auth_for_replication` إلى `1`. ويتوفر هذا بدءًا من PostgreSQL الإصدار 11 وما بعده؛ أما في الإصدارات الأقدم، فلا يمكنك تشغيل سوى ClickPipes من نوع `Initial Load Only`.
## إعداد الوصول إلى الشبكة
### التحكم في الوصول المستند إلى IP
إذا كنت تريد تقييد حركة المرور إلى مثيل RDS الخاص بك، فيُرجى إضافة [عناوين IP الثابتة لـ NAT الموثّقة](/ar/integrations/clickpipes/networking/static-ips) إلى `Inbound rules` في مجموعة الأمان الخاصة بـ RDS.
### الوصول الخاص عبر AWS PrivateLink
للاتصال بمثيل RDS الخاص بك عبر private network، يمكنك استخدام AWS PrivateLink. اتبع [setup guide الخاص بنا لـ AWS PrivateLink مع ClickPipes](/ar/resources/support-center/knowledge-base/cloud-services/aws-privatelink-setup-for-clickpipes) لإعداد connection.
### حلول بديلة لـ RDS Proxy
لا يدعم RDS Proxy اتصالات النسخ المتماثل المنطقي. إذا كانت لديك عناوين IP ديناميكية في RDS ولا يمكنك استخدام اسم DNS أو Lambda، فإليك بعض البدائل:
1. باستخدام مهمة cron، استخرج عنوان IP لنقطة نهاية RDS بشكل دوري وحدّث NLB إذا تغيّر.
2. باستخدام إشعارات أحداث RDS مع EventBridge/SNS: شغّل التحديثات تلقائيًا عبر إشعارات أحداث AWS RDS.
3. EC2 ثابت: انشر مثيل EC2 ليعمل كخدمة استقصاء دوري أو وكيل قائم على IP.
4. أتمتة إدارة عناوين IP باستخدام أدوات مثل Terraform أو CloudFormation.
## ما الخطوة التالية؟
يمكنك الآن [إنشاء ClickPipe الخاص بك](/ar/integrations/clickpipes/postgres/index) والبدء في إدخال البيانات من مثيل Postgres الخاص بك إلى ClickHouse Cloud.
احرص على تدوين تفاصيل الاتصال التي استخدمتها أثناء إعداد مثيل Postgres الخاص بك، لأنك ستحتاج إليها خلال عملية إنشاء ClickPipe.