> ## Documentation Index
> Fetch the complete documentation index at: https://private-7c7dfe99-trino-dialect.mintlify.site/llms.txt
> Use this file to discover all available pages before exploring further.
> Amazon RDS Postgres를 ClickPipes 소스로 설정합니다
# RDS Postgres 소스 설정 가이드
export const IAMAuthentication = ({engine, service, children}) => {
const services = {
aurora: {
name: 'Aurora',
resource: 'cluster',
id: 'cluster-xxxxxxxxxxxxxx'
},
rds: {
name: 'RDS',
resource: 'instance',
id: 'db-xxxxxxxxxxxxxx'
}
};
const createUserStatements = {
postgres: `CREATE USER clickpipes_iam_user;
GRANT rds_iam TO clickpipes_iam_user;`,
mysql: `CREATE USER 'clickpipes_iam_user' IDENTIFIED WITH AWSAuthenticationPlugin AS 'RDS';`
};
const svc = services[String(service).toLowerCase()];
const createUserSql = createUserStatements[String(engine).toLowerCase()];
if (!svc) throw new Error(`Unsupported IAM authentication service: ${service}`);
if (!createUserSql) throw new Error(`Unsupported IAM authentication engine: ${engine}`);
return <>
Instead of a password, you can authenticate the ClickPipes user with an AWS IAM role. This lets ClickPipes connect to your Amazon {svc.name} {svc.resource} without storing database credentials.
Enable IAM authentication
- Log in to your AWS account and go to the {svc.name} {svc.resource} you want to configure.
- Click Modify.
- Scroll to the Database authentication section.
- Select Password and IAM database authentication.
- Click Continue.
- Review the changes and select Apply immediately.
Create the ClickPipes user
Create the ClickPipes user with IAM authentication enabled, then grant it the same schema and replication privileges shown above:
{createUserSql}
{children}
Obtain the ClickHouse service IAM role ARN
- Log in to your ClickHouse Cloud account.
- Select the ClickHouse service you want to connect.
- Select the Settings tab.
- Scroll to the Network security information section at the bottom of the page.
- Copy the service's Service role ID (IAM) value, shown below.
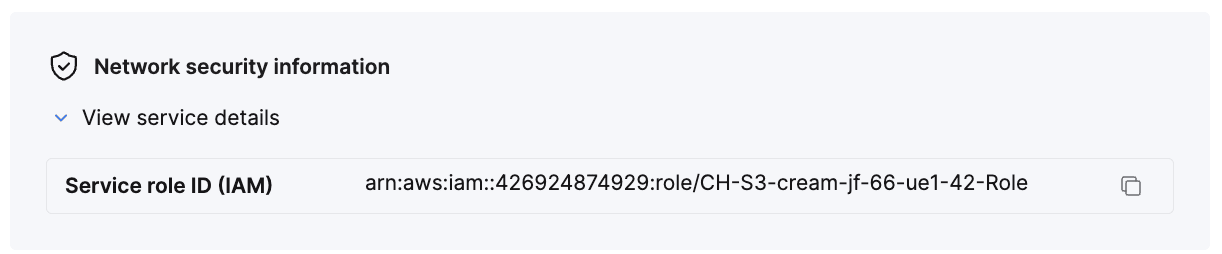
This value is your {'{ClickHouse_IAM_ARN}'} — the role ClickPipes uses to access your {svc.name} {svc.resource}.
Obtain the resource ID
- Log in to your AWS account and go to the {svc.name} {svc.resource} you want to configure.
- Select the Configuration tab.
- Note the Resource ID value — it looks like
{svc.id}. This is your {'{RDS_RESOURCE_ID}'}, which you reference in the permissions policy.
Create the IAM role
- Log in to your AWS account with an IAM user that has permission to create and manage IAM roles.
- Open the IAM console.
-
Create a new IAM role with the following trust and permissions policies.
Trust policy (replace {'{ClickHouse_IAM_ARN}'} with the IAM role ARN of your ClickHouse instance):
{`{
"Version": "2012-10-17",
"Statement": [
{
"Effect": "Allow",
"Principal": {
"AWS": "{ClickHouse_IAM_ARN}"
},
"Action": [
"sts:AssumeRole",
"sts:TagSession"
]
}
]
}`}
Permissions policy (replace {'{RDS_RESOURCE_ID}'} with the resource ID of your {svc.name} {svc.resource}, {'{RDS_REGION}'} with its region, and {'{AWS_ACCOUNT}'} with your AWS account ID):
{`{
"Version": "2012-10-17",
"Statement": [
{
"Effect": "Allow",
"Action": [
"rds-db:connect"
],
"Resource": [
"arn:aws:rds-db:{RDS_REGION}:{AWS_ACCOUNT}:dbuser:{RDS_RESOURCE_ID}/clickpipes_iam_user"
]
}
]
}`}
- Once the role is created, copy its ARN. This is your
{'{RDS_ACCESS_IAM_ROLE_ARN}'}.
You can now use this IAM role to authenticate with your {svc.name} {svc.resource} from ClickPipes.
;
};
export const Image = ({img, alt, size = "lg"}) => {
const normalizedSize = ["sm", "md", "lg"].includes(size) ? size : "lg";
return ;
};
## 지원되는 Postgres 버전
ClickPipes는 Postgres 12 이상을 지원합니다.
## 논리적 복제 활성화
RDS 인스턴스에 다음 설정이 이미 구성되어 있으면 이 섹션은 건너뛰어도 됩니다:
* `rds.logical_replication = 1`
이전에 다른 데이터 복제 도구를 사용한 경우에는 일반적으로 이 설정이 미리 구성되어 있습니다.
```text theme={null}
postgres=> SHOW rds.logical_replication ;
rds.logical_replication
-------------------------
on
(1 row)
```
아직 구성하지 않았다면 다음 단계를 따르십시오.
1. 필요한 설정이 포함된, 사용 중인 Postgres 버전에 맞는 새 파라미터 그룹을 생성합니다.
* `rds.logical_replication`을 1로 설정합니다
2. 새 파라미터 그룹을 RDS Postgres 데이터베이스에 적용합니다
3. 변경 사항을 적용하려면 RDS 인스턴스를 재부팅합니다
## 데이터베이스 사용자 구성
RDS Postgres 인스턴스에 관리자 사용자로 접속한 다음, 아래 명령을 실행합니다:
1. ClickPipes 전용 사용자를 생성합니다:
```sql theme={null}
CREATE USER clickpipes_user PASSWORD 'some-password';
```
2. 이전 단계에서 생성한 사용자에게 스키마(schema) 수준의 읽기 전용 액세스 권한을 부여합니다. 다음 예시는 `public` 스키마에 대한 권한을 보여줍니다. 복제하려는 테이블이 포함된 각 스키마에 대해 이 명령을 반복하십시오:
```sql theme={null}
GRANT USAGE ON SCHEMA "public" TO clickpipes_user;
GRANT SELECT ON ALL TABLES IN SCHEMA "public" TO clickpipes_user;
ALTER DEFAULT PRIVILEGES IN SCHEMA "public" GRANT SELECT ON TABLES TO clickpipes_user;
```
3. 사용자에게 복제 권한을 부여합니다:
```sql theme={null}
GRANT rds_replication TO clickpipes_user;
```
4. 복제하려는 테이블을 포함하는 [publication](https://www.postgresql.org/docs/current/logical-replication-publication.html)을 생성합니다. 성능 오버헤드를 피하려면 publication에는 필요한 테이블만 포함하는 것을 강력히 권장합니다.
publication에 포함되는 모든 테이블은 **기본 키(primary key)** 가 정의되어 있거나 **replica identity** 가 `FULL`로 설정되어 있어야 합니다. 범위를 지정하는 방법에 대한 자세한 내용은 [Postgres FAQs](/ko/integrations/clickpipes/postgres/faq#how-should-i-scope-my-publications-when-setting-up-replication)를 참조하십시오.
* 특정 테이블에 대한 publication을 생성하려면:
```sql theme={null}
CREATE PUBLICATION clickpipes FOR TABLE table_to_replicate, table_to_replicate2;
```
* 특정 스키마의 모든 테이블에 대한 publication을 생성하려면:
```sql theme={null}
CREATE PUBLICATION clickpipes FOR TABLES IN SCHEMA "public";
```
`clickpipes` publication은 변경 이벤트가 ClickPipes로 스트리밍될 테이블 집합을 정의합니다. 모든 테이블을 복제하려는 경우가 아니라면 `FOR ALL TABLES` 사용은 권장하지 않습니다. 불필요한 테이블을 포함하면 Postgres에서 ClickPipes로 전송되는 WAL 트래픽이 증가하고 전체 복제 효율이 저하되기 때문입니다.
### IAM authentication 사용(선택 사항)
복제에 IAM authentication을 사용하려면 `rds.iam_auth_for_replication` 매개변수를 `1`로 설정해야 합니다. 이 기능은 PostgreSQL 11 버전부터 지원되며, 그보다 이전 버전에서는 `Initial Load Only` ClickPipes만 실행할 수 있습니다.
## 네트워크 액세스 설정
### IP 기반 액세스 제어
RDS 인스턴스로의 트래픽을 제한하려면 [문서에 안내된 정적 NAT IP 주소](/ko/integrations/clickpipes/networking/static-ips)를 RDS 보안 그룹의 `인바운드 규칙`에 추가하십시오.
### AWS PrivateLink를 통한 비공개 액세스
비공개 네트워크를 통해 RDS 인스턴스에 연결하려면 AWS PrivateLink를 사용할 수 있습니다. 연결을 설정하려면 [ClickPipes용 AWS PrivateLink 설정 가이드](/ko/resources/support-center/knowledge-base/cloud-services/aws-privatelink-setup-for-clickpipes)를 따르십시오.
### RDS Proxy 우회 방안
RDS Proxy는 논리적 복제 연결을 지원하지 않습니다. RDS에서 동적 IP 주소를 사용하며 DNS 이름이나 Lambda를 사용할 수 없는 경우, 다음과 같은 대안을 고려할 수 있습니다:
1. cron 작업을 사용해 RDS endpoint의 IP를 주기적으로 확인하고, 변경된 경우 NLB를 업데이트합니다.
2. EventBridge/SNS와 함께 RDS Event Notifications 사용: AWS RDS 이벤트 알림을 사용해 업데이트가 자동으로 수행되도록 트리거합니다.
3. 고정 EC2: EC2 인스턴스를 배포해 폴링 서비스 또는 IP 기반 프록시 역할을 하도록 구성합니다.
4. Terraform 또는 CloudFormation 같은 도구를 사용해 IP 주소 관리를 자동화합니다.
## 다음 단계
이제 [ClickPipe를 생성](/ko/integrations/clickpipes/postgres/index)하고 Postgres 인스턴스의 데이터를 ClickHouse Cloud로 수집하기 시작할 수 있습니다.
ClickPipe 생성 과정에서 필요하므로 Postgres 인스턴스를 설정할 때 사용한 연결 정보를 반드시 기록해 두십시오.