> ## Documentation Index
> Fetch the complete documentation index at: https://private-7c7dfe99-trino-dialect.mintlify.site/llms.txt
> Use this file to discover all available pages before exploring further.
> 将亚马逊 Aurora Postgres 设置为 ClickPipes 的数据源
# Aurora Postgres 源设置指南
export const IAMAuthentication = ({engine, service, children}) => {
const services = {
aurora: {
name: 'Aurora',
resource: 'cluster',
id: 'cluster-xxxxxxxxxxxxxx'
},
rds: {
name: 'RDS',
resource: 'instance',
id: 'db-xxxxxxxxxxxxxx'
}
};
const createUserStatements = {
postgres: `CREATE USER clickpipes_iam_user;
GRANT rds_iam TO clickpipes_iam_user;`,
mysql: `CREATE USER 'clickpipes_iam_user' IDENTIFIED WITH AWSAuthenticationPlugin AS 'RDS';`
};
const svc = services[String(service).toLowerCase()];
const createUserSql = createUserStatements[String(engine).toLowerCase()];
if (!svc) throw new Error(`Unsupported IAM authentication service: ${service}`);
if (!createUserSql) throw new Error(`Unsupported IAM authentication engine: ${engine}`);
return <>
Instead of a password, you can authenticate the ClickPipes user with an AWS IAM role. This lets ClickPipes connect to your Amazon {svc.name} {svc.resource} without storing database credentials.
Enable IAM authentication
- Log in to your AWS account and go to the {svc.name} {svc.resource} you want to configure.
- Click Modify.
- Scroll to the Database authentication section.
- Select Password and IAM database authentication.
- Click Continue.
- Review the changes and select Apply immediately.
Create the ClickPipes user
Create the ClickPipes user with IAM authentication enabled, then grant it the same schema and replication privileges shown above:
{createUserSql}
{children}
Obtain the ClickHouse service IAM role ARN
- Log in to your ClickHouse Cloud account.
- Select the ClickHouse service you want to connect.
- Select the Settings tab.
- Scroll to the Network security information section at the bottom of the page.
- Copy the service's Service role ID (IAM) value, shown below.
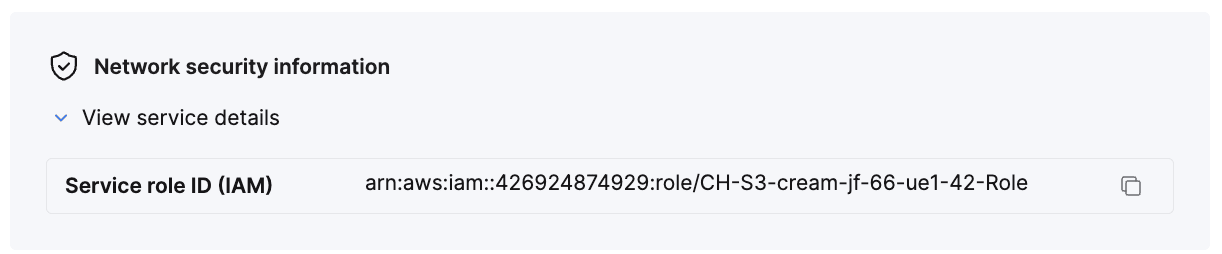
This value is your {'{ClickHouse_IAM_ARN}'} — the role ClickPipes uses to access your {svc.name} {svc.resource}.
Obtain the resource ID
- Log in to your AWS account and go to the {svc.name} {svc.resource} you want to configure.
- Select the Configuration tab.
- Note the Resource ID value — it looks like
{svc.id}. This is your {'{RDS_RESOURCE_ID}'}, which you reference in the permissions policy.
Create the IAM role
- Log in to your AWS account with an IAM user that has permission to create and manage IAM roles.
- Open the IAM console.
-
Create a new IAM role with the following trust and permissions policies.
Trust policy (replace {'{ClickHouse_IAM_ARN}'} with the IAM role ARN of your ClickHouse instance):
{`{
"Version": "2012-10-17",
"Statement": [
{
"Effect": "Allow",
"Principal": {
"AWS": "{ClickHouse_IAM_ARN}"
},
"Action": [
"sts:AssumeRole",
"sts:TagSession"
]
}
]
}`}
Permissions policy (replace {'{RDS_RESOURCE_ID}'} with the resource ID of your {svc.name} {svc.resource}, {'{RDS_REGION}'} with its region, and {'{AWS_ACCOUNT}'} with your AWS account ID):
{`{
"Version": "2012-10-17",
"Statement": [
{
"Effect": "Allow",
"Action": [
"rds-db:connect"
],
"Resource": [
"arn:aws:rds-db:{RDS_REGION}:{AWS_ACCOUNT}:dbuser:{RDS_RESOURCE_ID}/clickpipes_iam_user"
]
}
]
}`}
- Once the role is created, copy its ARN. This is your
{'{RDS_ACCESS_IAM_ROLE_ARN}'}.
You can now use this IAM role to authenticate with your {svc.name} {svc.resource} from ClickPipes.
;
};
export const Image = ({img, alt, size = "lg"}) => {
const normalizedSize = ["sm", "md", "lg"].includes(size) ? size : "lg";
return ;
};
## 支持的 Postgres 版本
ClickPipes 支持 Aurora PostgreSQL-Compatible Edition 12 及更高版本。
## 启用逻辑复制
如果你的 Aurora 实例已配置以下设置,则可以跳过本节:
* `rds.logical_replication = 1`
如果你之前使用过其他数据复制工具,通常会预先启用此设置。
```text theme={null}
postgres=> SHOW rds.logical_replication ;
rds.logical_replication
-------------------------
on
(1 row)
```
如果尚未配置,请按照以下步骤操作:
1. 为您的 Aurora PostgreSQL 版本创建一个新的参数组,并配置所需设置:
* 将 `rds.logical_replication` 设置为 1
2. 将新的参数组应用到您的 Aurora PostgreSQL 集群
3. 重启您的 Aurora 集群以应用更改
## 配置数据库用户
以管理员身份连接到您的 Aurora PostgreSQL 写入 实例,并执行以下命令:
1. 为 ClickPipes 创建一个专用用户:
```sql theme={null}
CREATE USER clickpipes_user PASSWORD 'some-password';
```
2. 为上一步创建的用户授予 schema 级别的只读访问权限。以下示例展示了 `public` schema 的权限。对每个包含待复制表的 schema,都重复执行这些命令:
```sql theme={null}
GRANT USAGE ON SCHEMA "public" TO clickpipes_user;
GRANT SELECT ON ALL TABLES IN SCHEMA "public" TO clickpipes_user;
ALTER DEFAULT PRIVILEGES IN SCHEMA "public" GRANT SELECT ON TABLES TO clickpipes_user;
```
3. 向该用户授予复制特权:
```sql theme={null}
GRANT rds_replication TO clickpipes_user;
```
4. 使用您想要复制的表创建一个 [publication](https://www.postgresql.org/docs/current/logical-replication-publication.html)。我们强烈建议仅在 publication 中包含必要的表,以避免额外的性能开销。
publication 中包含的任何表都必须定义了**主键**,\_或\_将其**副本标识**配置为 `FULL`。有关范围界定的指导,请参阅 [Postgres FAQ](/zh/integrations/clickpipes/postgres/faq#how-should-i-scope-my-publications-when-setting-up-replication)。
* 为特定表创建 publication:
```sql theme={null}
CREATE PUBLICATION clickpipes FOR TABLE table_to_replicate, table_to_replicate2;
```
* 为特定 schema 中的所有表创建 publication:
```sql theme={null}
CREATE PUBLICATION clickpipes FOR TABLES IN SCHEMA "public";
```
`clickpipes` publication 定义了哪些表的变更事件会流式传输到 ClickPipes。除非您打算复制所有表,否则不建议使用 `FOR ALL TABLES`,因为包含不必要的表会增加从 Postgres 到 ClickPipes 的 WAL 流量,并降低整体复制效率。
### 使用 IAM 身份验证 (可选)
用于复制的 IAM 身份验证要求将 `rds.iam_auth_for_replication` 参数设置为 `1`。
## 配置网络访问
### 基于 IP 的访问控制
如果你想限制流向 Aurora 集群的流量,请将[文档中列出的静态 NAT IP 地址](/zh/integrations/clickpipes/networking/static-ips)添加到 Aurora 安全组 (Security Group) 的 `Inbound rules` 中。
### 通过 AWS PrivateLink 进行私有访问
要通过私有网络连接到您的 Aurora 集群,您可以使用 AWS PrivateLink。请按照我们的 [ClickPipes 的 AWS PrivateLink 设置指南](/zh/resources/support-center/knowledge-base/cloud-services/aws-privatelink-setup-for-clickpipes) 来建立连接。
### Aurora 特定注意事项
在为 Aurora PostgreSQL 设置 ClickPipes 时,请牢记以下注意事项:
1. **连接端点**:始终连接到 Aurora 集群的写入端点,因为逻辑复制需要写入权限来创建 replication slots,并且必须连接到主实例。
2. **故障转移处理**:发生故障转移时,Aurora 会自动将一个只读实例提升为新的写入实例。ClickPipes 会检测到连接中断,并尝试重新连接到写入端点;此时该端点会指向新的主实例。
3. **Global Database**:如果你使用的是 Aurora Global Database,应连接到主区域的写入端点,因为跨区域复制已经负责处理区域之间的数据移动。
4. **存储注意事项**:Aurora 的存储层由集群中的所有实例共享,与标准 RDS 相比,这通常能为逻辑复制提供更好的性能。
### 处理动态集群端点
虽然 Aurora 提供了可自动路由到相应实例的稳定端点,但还可以采用以下方法来进一步确保连接稳定:
1. 对于高可用部署,请将应用程序配置为使用 Aurora 写入端点,它会自动指向当前的主实例。
2. 如果使用跨区域复制,请考虑为每个区域分别设置 ClickPipes,以降低延迟并提高容错能力。
## 下一步是什么?
现在,您可以[创建您的 ClickPipe](/zh/integrations/clickpipes/postgres/index),并开始将 Aurora PostgreSQL 集群中的数据摄取到 ClickHouse Cloud。
请务必记下您在设置 Aurora PostgreSQL 集群时使用的连接信息,因为在创建 ClickPipe 的过程中需要用到这些信息。